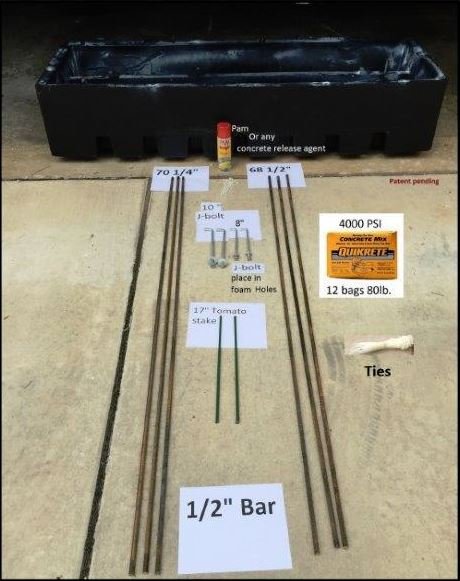
Use tube of grease or any concrete release agent. Apply on inside.
Buy 2 20′ bars of 1/2 inch Rebar and cut: 3 pieces 70 ¼” & 3 pieces 68 ½” long.
Buy 2 tomato stakes each 17″ to place as cross members for horizontal slots (this will hold up the bars of rebar and keep them in position as concrete is poured around them).
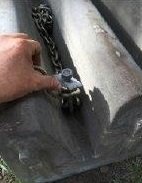
2 10″ J bolts (these will be set in concrete and used later to attach chains and your tractor will be able to lift it up while you remove the form).
2 8″ J bolts (these are used to lift the product from the top and set them in your opening).
If you have a fork lift you will not need to install these 8″ J bolts.
12 bags of 80 lb 4000 psi concrete mix.
Some tie wires or plastic zips to fasten the rebar to the J bolts and the tomato sticks.
Step 1
Spray the inside of the form with silicone spray or another approved concrete form release agent.
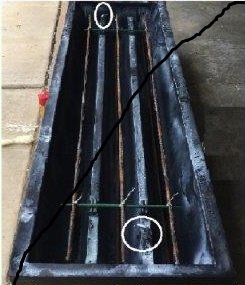
Lay the rebar grid according to the reinforcement plan, maintaining at least 2 inches of clearance from all edges.
Install lift hooks or eyebolts securely before the pour.
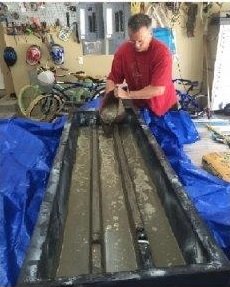
Step 2: Begin Pour – Use 4000 PSI Concrete, Fill Halfway
Mix and pour 4000 PSI concrete into the form until it’s half full.
Spread the mix evenly across the form to prevent shifting or imbalance.
Step 3: Settle and Level
Use a rod, shovel, or concrete vibrator to work the mix around the rebar and into corners.
Ensure there are no air pockets or voids under the reinforcement.
When the form is half full, tap both ends and sides with a hammer or rubber mallet to release trapped air.
Then continue pouring until the form is full, and strike off and smooth the top surface.
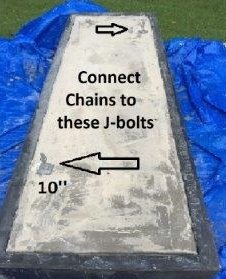
Step 4: Install J-Bolts and Cure
While the concrete is still plastic, insert J-bolts at the designated anchor points.
Check alignment and depth.
Allow the concrete to cure undisturbed for 48–72 hours, keeping it covered or damp as needed.
Step 5: Install J-Bolts and Cure
While the concrete is still plastic, insert J-bolts at the designated anchor points.
Check alignment and depth.
Allow the concrete to cure undisturbed for 48–72 hours, keeping it covered or damp as
needed.
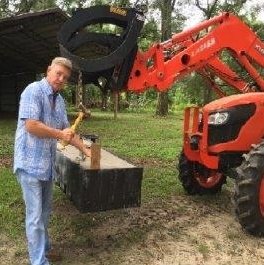
Step 6: Attach Chain to J-Hooks
Once the concrete is fully cured, attach lifting chains or slings securely to the J-hooks.
Confirm even load distribution before lifting.
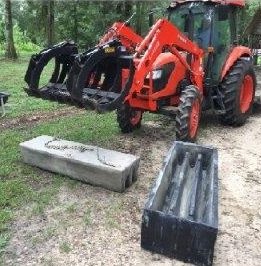
Step 7: Lift Cattle Guard From the Form
Using a loader, forklift, or crane, carefully lift the cured cattle guard out of the form.
Avoid sudden jerks or twisting that could crack the slab or damage embedded hardware.
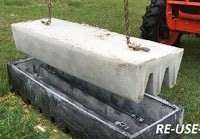
Step 8: Transport and Position
Move the cattle guard to its designated location.
Set it square and level on the prepared gravel pad, ensuring the top remains elevated above grade as intended.
Step 9: Final Alignment and Backfill
Confirm alignment, elevation, and stability.
Backfill around the edges with compacted gravel or soil to lock it in place and maintain
proper drainage.
PREPARE SITE
Before setting the form, select and prepare the installation area:
Choose a level, well-drained location aligned with the roadway or gate.
Excavate approximately 8 inches deep — this allows the cattle guard to sit elevated above grade for better drainage and visibility.
Add a 4–6 inch layer of compacted gravel to stabilize the base and promote water runoff.
Verify level and alignment before positioning the form.